

Late Mini head-lining fitting guide- Minis Mk3 to Mk7
The Mk3 Mini used the one-piece head-liner that was effectively introduced in 1963 on the Mk2 versions of the Riley Elf and Wolseley Hornet. These are more difficult to fit than the earlier Mini Mk1 and Mk2 head-linings (a sub-assembly that can be made up on a workbench), as they are fitted straight into the body of the car. A typically worn original assembly as fitted to all Mk3 - Mk7 Mini saloons (with a full tin roof) is shown below, complete with original creases, glue and nicotine stains!

Tools & Materials
When it comes to actually fitting the headlining, few tools will be required. At least 4, and as many as 7 or 8 strong pinch clamps or even bulldog clips (as you would use on a clip-board) will be essential to fitting the liner into the car. A set of these can be picked up from most DIY outlets for very little money, and if you buy them new for the job they will at least be nice and clean for the fresh material. Otherwise, a sharp craft knife, a Philips and flat bladed screw-driver, a good quantity (say 400ml) of contact adhesive and a brush to apply it, should be all you need. We use those small hand-held glue brushes which can be pumped to supply more glue. We appreciate that not everyone will have one of these, but they are well worth the expenditure and last well if properly maintained by cleaning with solvent.

The whole installation, if it is to be done properly, requires the removal of the front and rear screens, side rear windows, and rubbers. This is because the Mk3 headlining is glued to the body all round the sides of the roof, before the material is effectively ‘sealed’ with the refitted window rubbers and draught excluders, which are fed over various lips and edges to keep out the elements. There are a couple of small sections totalling only a few inches which require very careful trimming; very visible inside the car, the points at the top of the A and B posts (where the pillars meet the roof), and around the interior courtesy light fitting, are always a bit of a fiddle. It is well worth familiarising yourself with these details on the existing liner both before and after it has been removed, to see how the factory finished off these areas. The front seats and belts will need to be removed or tidied away inside the car so that they do not get damaged or obstruct progress. The rear seat back and base can remain in the car until the C-posts come to be fitted, but should be thoroughly covered over to protect against damage from glue.
Removal of glazing
To remove the front and rear screens, first of all the filler strips must be removed from the main rubbers. This is fairly easy to do; as they are not continuous and most have shrunk or been fitted too short, one end of the strip can be picked out with something like a flat bladed screw-driver, and the rest simply pulled out. It is then possible to slide something reasonably thin between the lip of the main rubber and the glass, inside and out. An old butter knife or similar is ideal, as long as it isn’t too sharp should you wish to retain and re-use the screen rubber. The purpose of this is to break the seal between the rubber and whichever kind of putty or sealant might have been used to help the rubber mount. Once this is done it is quite easy to push the screen out carefully from inside the car. Starting in one corner makes it easier, and ideally there needs to be a second pair of hands easing the external lip outwards to get the screen out of its natural position. Once a few inches of the screen have been pulled from the rubber the rest follows on fairly easily, especially so if dragged out from outside of the car.

Above: Breaking the seal of the windscreen, applying careful pressure. Use a pointed blunt instrument- sharp objects can damage the glass.


The rear side screens, if they open, are held in with self tappers and are therefore simply removed with a screw-driver. Fixed rear side windows are mounted with a conventional rubber gasket and effectively fit/strip down in the same manner as the front and rear screens, however lacking the filler strip. As before, the glass will need to be re-fitted after the headlining has been fitted and trimmed. Professional help here from a vehicle glazer is recommended- putting the glass back is nowhere near as simple as the removal, and we have found from experience that it is all to easy to fall at the last hurdle and break the screen!


Above: Note the positions of the rear window gasket/draught excluder joints before removal, if they are to be re-used. If new rubbers are being fitted, the join should basically be at the bottom so that water does not collect inside the section.


Removing the original liner! Make a mental note of the construction and perhaps take a few photographs as you progress.


Take care not to damage the wiring to the heated rear windows (where fitted) when removing the C post liners. Rear seat belt brackets will be fitted through the liners of later cars, though these are easily removed by withdrawing a couple of bolts.

Seat belt anchorage caps- easy to prise of from the square end with a flat bladed screwdriver. Take care not to damage surrounding areas of the body.


Getting the new liner fitted!
Fitting the headlining we would judge to be a two-person job in an ideal world, working as a team one inside and one outside the car. We suspect it is possible to do it single handedly, but it would take a lot of to-ing and fro-ing in and out of the car to review progress, fetch tools and the like; quite tiring work in the absence of that third hand! With two people even there is plenty of work to do, but the company does speed the job up, and as you move around the car the there is ample opportunity for good teamwork as one can normally reach where the other cannot, saving a lot of effort.

Firstly, it is a good idea in the interests of insulation (both from the elements and noise) to glue some new felt into the roof of the car. The original felt may be re-used if it is in good condition however, it is recommended that even if this is the case, it is first removed and then re-glued to extend its life. Next, either re-thread the original roof hoops/stays into the new headlining material (clean them first to remove corrosion and restore a slippery easy fitting shine), or thread a new set- our part no. HL3030. If you are re-using your old stays, make a note of their position in the car’s old headlining according to the order of the coloured plastic end caps. These were always colour coded for fitting on the lines in Longbridge, and our replacement sets are supplied using the exact same logic to dictate position complete with a set of their own instructions. Note that the ‘wide’ end of the new headlining material is for the front of the car- the back has closer seams between hoops, and therefore much smaller panels of material.


The next step is to locate the stays in position, so that the headlining is hanging in the car. This is where the clamps are vital to tension the headlining down the length of the vehicle- a couple at the back and a couple of the rear, at least to hold the whole lot roughly in place and at least out of the way inside the car. You will note that even then, the hoops will only hang loosely inside the car, whereas they need to end up close to vertical in order to fill the roof. It is best to start in the middle and work outwards, choosing the headlining panel that straddles the B pillar, support the front-most roof hoop by clamping the next panel forward along the tops of the door jambs. Quickly after that, pull the hoop behind the B pillar into its upright position, clamping the excess material from the panel behind that into place along the top of the window recess. This will support the middle headlining panel close to where it needs to finish up.

(See how easy it is to dirty the new headlining- luckily this is the rear of the material and will not show through. There is less chance of dirst transfering from the body of the car, if it is first cleaned and hoovered.)

Making sure that the headlining is roughly ‘middled’ (equal amounts of material, across the car) pull the headlining taught until roughly the same amount is spare either side, and then mark a few lines with a pencil lightly on the back where the window and door jamb edges lay on the headlining. Stretched properly, there should be up to 4 inches / 10cm either side ‘spare’ (depending on the material). Technically a couple of inches of material are actually useful to hold onto, whereas the remainder will be turned over onto the reverse side of the body pressing (outward facing edge) and then cut away. Apply glue evenly, and not too thickly to the headlining around 1 ½ inches each side of the line sketched in on the reverse of the headlining, and to the body of the car around the bottom edge of the cant rail and each side of the window and door lips. You can be much more liberal with the glue applied to the body.

At this point in time before pulling the glued material over the cant rail (at which point the contact adhesive should grip very quickly) waft a hairdryer or heat gun generally around the panel of material you are working on and then concentrate it a little more in the area where you will be stretching it across. This greatly increases the flexibility and smoothing abilities of the headlining, and also serves to cure the glue a little before finally stretching over and up into position. This task is much easier with one person working from inside the car, tamping the material up onto the cant rail, smoothing the material out gently onto the glued areas, as another person outside the car basically pulls the material across and maintains the proper tension on it. Having anchored one side, the opposite pillar will then finish that panel, after which it is best to work panel by panel towards either the front or the rear. Having finished one end, you can work towards the other! It is much easier once you have done a couple of panels; although it would be a blatant lie to suggest that the rest fall into place, you do get a bit of a rhythm going as you watch the installation progress. Imagine doing it day in, day out, on a line in Longbridge!


Finishing the back of the car- C-posts and spare material
The headlining kit includes a strip of 'spare' material- this is intended to cover the body immediately below the rear screen, between the two C-posts. If you have retained the original item, it is quite easy to see how it should be glued in place. Waft a heat-gun over the material first because this piece can appear a little creased- the wrinkles will soon stretch out. Again, glue needs to be applied evenly to the body and to the material.


Note that the rear corners should be slit a little to allow the material to stretch around easily. The material lying in the bottom of the parcel shelf does not need to be trimmed off- it can be left in situ and will sit happily underneath the rear parcel shelf when that item is refitted.


The C-posts can be fiddly to re-fit- to an extent they are held in place by the side window rubbers/draught excluders, or the opening over centre mechanism, but especially on later cars the upper rear seat belt mounting bracket will also very effectively govern the final position. The rear window, when it comes to be re-fitted, should also be used to help to hold the C-posts in position, with the the overlap of the rubber window seal.


Job done!
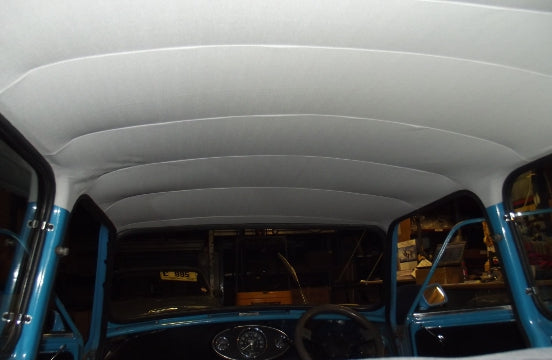
Take a look at that lovely new headlining! We prefered to finish the B-posts off a little further down the body, straight across the bottom of the window radius, which is not how the factory would have done it... but we think it is neater, avoiding a 'raw' material edge and looking a little more finished. It is down to the owner to decide these details, but as you have seen the process is very involved and there is ample opportunity to consider these things as you progress. The draught excluder easily push fits back into place, effectively sealing around the top of the door jamb. Only the interior light now remains to be screwed back in, and the glazers can also be called in to finish off the job.
-
Shaun Henderson
Comments on this post (1)
This is probably the best guide to how to fit the headlining into a Mini, in my case a ‘65 Elf.
Very well done, thank you
— Gordon Bradford